mirror of
https://github.com/RIOT-OS/RIOT.git
synced 2024-12-29 04:50:03 +01:00
131 lines
4.4 KiB
Plaintext
131 lines
4.4 KiB
Plaintext
/**
|
|
@defgroup boards_saml21-xpro Atmel SAM L21 Xplained Pro
|
|
@ingroup boards
|
|
@brief Support for the Atmel SAM L21 Xplained Pro board.
|
|
|
|
## Overview
|
|
|
|
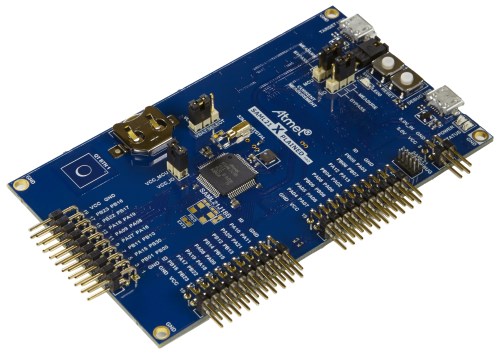
The `SAML21 Xplained Pro` is an ultra-low power evaluation board by Atmel
|
|
featuring a ATSAML21J18A SoC. The SoC includes a SAML21 ARM Cortex-M0+ micro-
|
|
controller. For programming the MCU comes with 32Kb of RAM and 256Kb of flash
|
|
memory.
|
|
|
|
The saml21-xpro is available from various hardware vendors for ~50USD (as of
|
|
oct. 2015).
|
|
|
|
*Please note:* ATMEL's most recent SAML21s are the `B` variant, or
|
|
`ATSAML21J18B`. Because the driver changes are mostly small, throughout this
|
|
reference the device will continue to be referred to as the `ATSAML21J18[A/B]`
|
|
indiscriminately;
|
|
|
|
## Hardware
|
|
|
|

|
|
|
|
|
|
### MCU
|
|
| MCU | ATSAML21J18A |
|
|
|:------------- |:--------------------- |
|
|
| Family | ARM Cortex-M0+ |
|
|
| Vendor | Atmel |
|
|
| RAM | 32Kb |
|
|
| Flash | 256Kb |
|
|
| Frequency | up to 48MHz |
|
|
| FPU | no |
|
|
| Timers | 8 (16-bit) |
|
|
| ADCs | 1x 12-bit (20 channels) |
|
|
| UARTs | max 6 (shared with SPI and I2C) |
|
|
| SPIs | max 6 (see UART) |
|
|
| I2Cs | max 6 (see UART) |
|
|
| Vcc | 1.8V - 3.6V |
|
|
| Datasheet | [Datasheet](http://www.atmel.com/Images/Atmel-42385-SAM-L21-Datasheet.pdf) |
|
|
| Board Manual | [Board Manual](http://www.atmel.com/Images/Atmel-42405-SAML21-Xplained-Pro_User-Guide.pdf)|
|
|
|
|
### User Interface
|
|
|
|
1 User button and 1 LED:
|
|
|
|
| Device | PIN |
|
|
|:------ |:--- |
|
|
| LED0 | PB10 |
|
|
| SW0 (button) | PA02 |
|
|
|
|
|
|
## Implementation Status
|
|
|
|
| Device | ID | Supported | Comments |
|
|
|:------------- |:------------- |:------------- |:------------- |
|
|
| MCU | saml21 | partly | PLL clock not implemented |
|
|
| Low-level driver | GPIO | yes | |
|
|
| | PWM | no | |
|
|
| | UART | yes | |
|
|
| | I2C | yes | |
|
|
| | SPI | yes | |
|
|
| | USB | no | |
|
|
| | RTT | yes | |
|
|
| | RTC | yes | |
|
|
| | RNG | no | |
|
|
| | Timer | yes | |
|
|
| | ADC | yes | |
|
|
|
|
|
|
|
|
## Flashing the device
|
|
|
|
Connect the device to your Micro-USB cable using the port labeled as *EDBG*.
|
|
|
|
The standard method for flashing RIOT to the saml21-xpro is using OpenOCD.
|
|
Please note that even the latest official OpenOCD (v0.9 at the time of this
|
|
writing) does not support B-variant SAML21 devices.
|
|
|
|
If you attempt to flash a board, and OpenOCD throws a `Couldn't find part
|
|
correspoding to DID XXXXXXXX` error, you will need to compile your own OpenOCD
|
|
from source.
|
|
|
|
Refer to https://github.com/RIOT-OS/RIOT/wiki/OpenOCD for general
|
|
instructions on building OpenOCD and make sure "cmsis-dap" and "hidapi-libusb"
|
|
are enabled.
|
|
|
|
On Linux you will have to add a **udev** rule for hidraw, like
|
|
```
|
|
bash
|
|
echo 'KERNEL=="hidraw*", SUBSYSTEM=="hidraw", MODE="0664", GROUP="plugdev"' \
|
|
| sudo tee -a /etc/udev/rules.d/99-usb.rules
|
|
sudo service udev restart
|
|
```
|
|
|
|
### Arch Linux
|
|
With yaourt:
|
|
```
|
|
yaourt -S hidapi-git
|
|
yaourt -S openocd-git
|
|
# edit PKGBUILD, add "cmsis-dap hidapi-libusb" to "_features"
|
|
```
|
|
|
|
### Ubuntu
|
|
Although this refers to setting up the SAMR21, this guide is still very
|
|
helpful to understanding how to set up a solid RIOT development environment for
|
|
the SAML21: http://watr.li/samr21-dev-setup-ubuntu.html
|
|
|
|
## Supported Toolchains
|
|
|
|
For using the saml21-xpro board we strongly recommend the usage of the [GNU Tools for ARM Embedded Processors](https://launchpad.net/gcc-arm-embedded)
|
|
toolchain.
|
|
|
|
|
|
## Known Issues / Problems
|
|
|
|
### Stack sizes
|
|
The default stack sizes have not been tuned properly yet. If in doubt why
|
|
your application crashes try increasing the default stack sizes and use `ps` to
|
|
find out how much stack is being used.
|
|
Tracked in https://github.com/RIOT-OS/RIOT/issues/2228
|
|
|
|
### Not flashable by OpenOCD anymore
|
|
It can happen that OpenOCD is not able to program the board, because of wrong
|
|
clock configuration or low power modes. In this case you can use
|
|
[this little tool](https://github.com/ataradov/edbg) to erase the flash. Just follow the
|
|
instructions to build it and run `./edbg -e` to erase the flash. Then press the
|
|
reset button and you're able to program via OpenOCD again.
|
|
*/
|