mirror of
https://github.com/RIOT-OS/RIOT.git
synced 2024-12-29 04:50:03 +01:00
249 lines
8.6 KiB
Plaintext
249 lines
8.6 KiB
Plaintext
/**
|
|
@defgroup boards_airfy-beacon Airfy Beacon
|
|
@ingroup boards
|
|
@brief Support for the Airfy Beacon board
|
|
|
|
## Overview
|
|
|
|
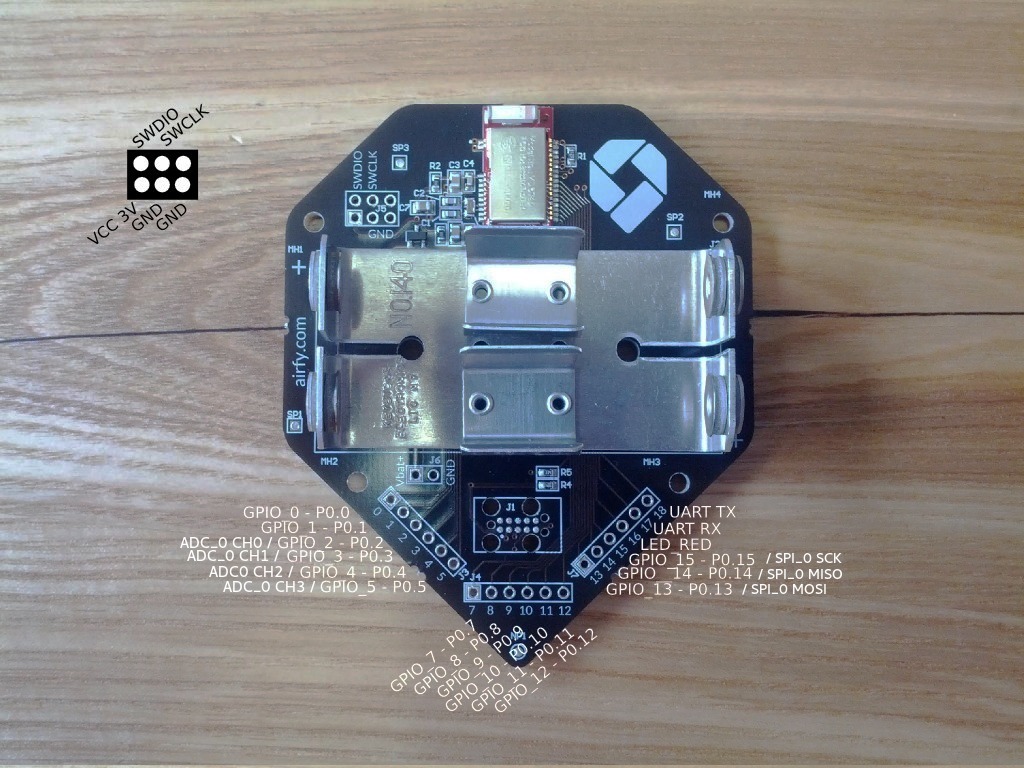
The Airfy Beacon is utilizing a Nordics NRF51822QFAA SoC.
|
|
The SoC features 16KiB of RAM, 256KiB of flash ROM and comes on top of the
|
|
usual micro-controller peripherals with a 2.4GHz radio that supports both
|
|
Nordics proprietary ShockBurst as well as Bluetooth Low Energy (BLE).
|
|
|
|
The board was available via
|
|
[Indiegogo](https://www.indiegogo.com/projects/airfy-beacon-make-your-smart-home-even-smarter).
|
|
|
|
## Hardware
|
|
|
|

|
|
|
|
| MCU | NRF51822QFAA |
|
|
|:--------------------- |:--------------------------------- |
|
|
| Family | ARM Cortex-M0 |
|
|
| Vendor | Nordic Semiconductor |
|
|
| RAM | 16KiB |
|
|
| Flash | 256KiB |
|
|
| Frequency | 16MHz |
|
|
| FPU | no |
|
|
| Timers | 3 (2x 16-bit, 1x 32-bit [TIMER0]) |
|
|
| ADCs | 1x 10-bit (8 channels) |
|
|
| UARTs | 1 |
|
|
| SPIs | 2 |
|
|
| I2Cs | 2 |
|
|
| Vcc | 1.8V - 3.6V |
|
|
| Product Specification | [Product Specification](https://infocenter.nordicsemi.com/pdf/nRF51822_PS_v3.3.pdf) |
|
|
| Reference Manual | [Reference Manual](https://infocenter.nordicsemi.com/pdf/nRF51_RM_v3.0.1.pdf) |
|
|
|
|
## Unlocking the flash memory
|
|
|
|
If you're holding a new device in your hands, there is a high change that
|
|
your device's flash memory is locked and RIOT's `make flash` command will fail,
|
|
saying something like erasing the flash was not possible.
|
|
|
|
A solution for this is to reset the chips code memory and user information
|
|
registers. Just follow these steps:
|
|
|
|
1. Follow the steps described above for manually flashing the device:
|
|
|
|
1. start openocd using the correct config file
|
|
`openocd -f boards/airfy-beacon/dist/openocd.cfg`
|
|
2. connect to openocd using telnet `telnet localhost 4444`
|
|
|
|
2. type `halt` to stop the device
|
|
3. type `nrf51 mass_erase` to reset the code memory
|
|
4. all done, `make flash` should now work as expected.
|
|
|
|
|
|
## Flashing and Debugging
|
|
The Airfy Beacon comes without any on-board programming and flashing
|
|
capabilities. It supports however to be programmed using off-the-shelf
|
|
programmers such as Segger's JLink or STM's STLink.
|
|
|
|
A very simple and affordable way to program and debug this module is to use
|
|
the integrated ST-Link/V2 programmer of any STM32Fx-discovery board. The needed
|
|
steps are described in the following sections. If you want to use a standalone
|
|
ST-Link adapter, you just simply have to alter the wiring to fit for your
|
|
programmer, the software part is identical.
|
|
|
|
### Hardware
|
|
First of all make sure the your ST-Link device is detected and can be
|
|
accessed properly. In Linux you might have to adept your `udev` rules
|
|
accordingly:
|
|
```
|
|
> cat 49-stlinkv2.rules
|
|
# stm32 discovery boards, with onboard st/linkv2
|
|
# ie, STM32L, STM32F4.
|
|
# STM32VL has st/linkv1, which is quite different
|
|
|
|
SUBSYSTEMS=="usb", ATTRS{idVendor}=="0483", ATTRS{idProduct}=="3748", \
|
|
MODE:="0666", \
|
|
SYMLINK+="stlinkv2_%n"
|
|
|
|
# If you share your linux system with other users, or just don't like the
|
|
# idea of write permission for everybody, you can replace MODE:="0666" with
|
|
# OWNER:="yourusername" to create the device owned by you, or with
|
|
# GROUP:="somegroupname" and manage access using standard unix groups.
|
|
|
|
> sudo cp 49-stlinkv2.rules /etc/udev/rules.d/
|
|
> sudo udevadm control --reload-rules
|
|
> sudo udevadm trigger
|
|
```
|
|
now replug the usb cable and flash.
|
|
|
|
Have a look at the 'Setting up udev rules' section in the
|
|
[README file](https://github.com/texane/stlink) if you need help.
|
|
|
|
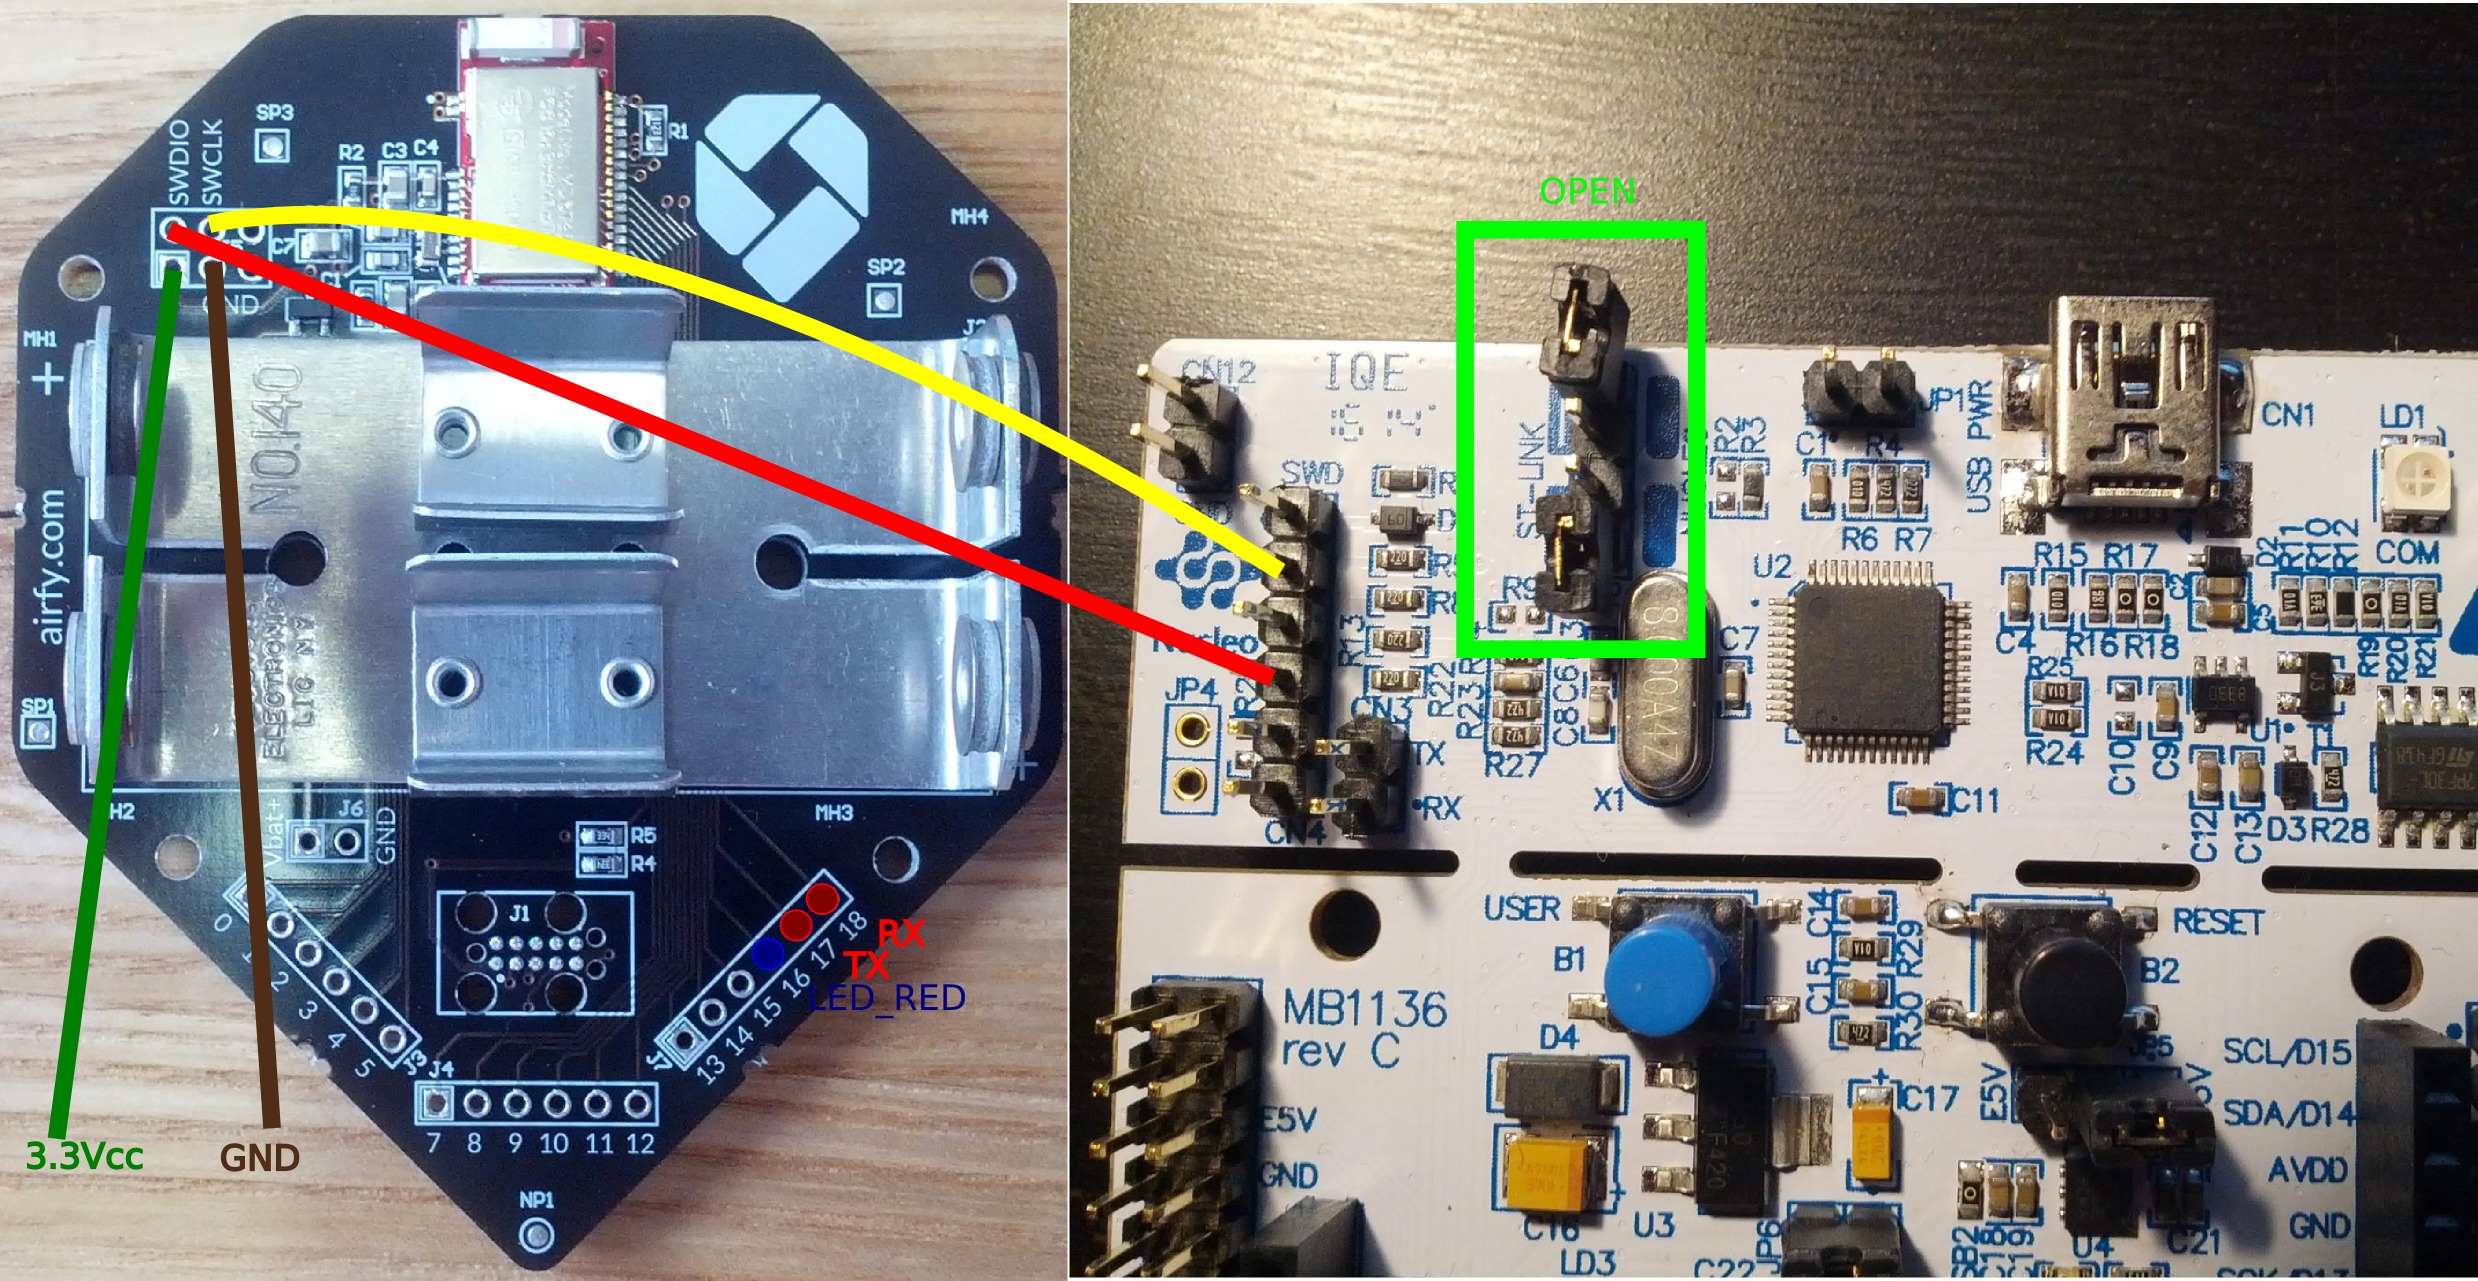
Second you need to enable the standalone ST-Link mode of the discovery board
|
|
by removing the two `CN2` jumpers, found somewhere in the upper left part of the
|
|
board. This disconnects the ST-Link programmer from the micro-controller part of
|
|
the port and enables direct access through the pin-header `CN3`, also labeled
|
|
`SWD`.
|
|
|
|
This module supports the Serial Wire Debug (SWD) interface. To access the
|
|
device the following four lines need to be connected with the STM32x-discovery
|
|
board:
|
|
```
|
|
Airfy Beacon STM32Fx-discovery
|
|
common ground: GND <-----------> GND
|
|
supply voltage: VDD <-----------> 3V
|
|
SWD clock: SWDCLK <-----------> SWCLK (CN3, pin2)
|
|
SWD data I/O: SWDIO <-----------> SWDIO (CN3, pin4)
|
|
```
|
|
|
|
The following image shows the wiring for an SWD flasher board:
|
|
|
|

|
|
|
|
### Software
|
|
Debugging and programming this module works well with
|
|
[OpenOCD](http://openocd.org/).
|
|
|
|
We suggest to use a fairly recent version, best use the upstream version from
|
|
their [git repository](http://sourceforge.net/p/openocd/code/ci/master/tree/).
|
|
Version `Open On-Chip Debugger 0.9.0-dev-00184-g885f438 (2014-10-19-14:49)`
|
|
is reported to work.
|
|
|
|
### Programming the Device
|
|
To program the Airfy Beacon, just go to your RIOT application and type:
|
|
```
|
|
make flash
|
|
```
|
|
and voila, the new firmware should be flashed onto your device.
|
|
|
|
### Resetting the Device
|
|
As the Airfy Beacon module does not provide a reset button, RIOT includes a
|
|
target to reset the board. To do that, just type
|
|
```
|
|
make reset
|
|
```
|
|
and your board will reboot.
|
|
|
|
### Debugging the Device
|
|
The debugging setup comprises of two parts: a GDB server and a GDB client. To
|
|
usual workflow is to start the GDB server first and then connect to it with some
|
|
kind of front-end (e.g. command line, IDE, ...).
|
|
|
|
To start the GDB server, just type
|
|
```
|
|
make debug-server
|
|
```
|
|
This will start a local GDB server on `port 3333`.
|
|
|
|
If you are fine with working with the GDB command line client, you can start
|
|
debugging your device by just typing
|
|
```
|
|
make debug
|
|
```
|
|
in a second terminal window. This will automatically connect to your
|
|
previously opened GDB server and will also load your corresponding .elf file.
|
|
|
|
Alternatively you can configure your IDE (e.g. eclipse or similar) to connect
|
|
directly to the GDB server. [See here for more information on how to configure
|
|
Eclipse](https://github.com/RIOT-OS/RIOT/wiki/Using-the-Eclipse-IDE-for-C-and-
|
|
CPP-Developers,-Howto)
|
|
|
|
|
|
### Program the device manually
|
|
For OpenOCD to work correctly, you need the following configuration file
|
|
(which you can also find in `RIOTDIR/boards/airfy-beacon/dist/openocd.cfg`:
|
|
|
|
```
|
|
$ cat RIOTDIR/boards/airfy-beacon/openocd.cfg
|
|
# nRF51822 Target
|
|
source [find interface/stlink-v2.cfg]
|
|
|
|
transport select hla_swd
|
|
|
|
set WORKAREASIZE 0x4000
|
|
source [find target/nrf51.cfg]
|
|
|
|
# use hardware reset, connect under reset
|
|
#reset_config srst_only srst_nogate
|
|
```
|
|
|
|
You can now program your device by doing the following:
|
|
|
|
1. start openocd with: `openocd -d3 -f RIOTDIR/boards/airfy-
|
|
beacon/dist/openocd.cfg`
|
|
2. open a new terminal an connect with telnet: `telnet 127.0.0.1 4444`
|
|
3. do the following steps to flash (only use bank #0 starting from address
|
|
0):
|
|
|
|
```
|
|
> flash banks
|
|
#0 : nrf51.flash (nrf51) at 0x00000000, size 0x00040000, buswidth 1,
|
|
chipwidth 1
|
|
#1 : nrf51.uicr (nrf51) at 0x10001000, size 0x000000fc, buswidth 1, chipwidth
|
|
1
|
|
|
|
> halt
|
|
target state: halted
|
|
target halted due to debug-request, current mode: Thread
|
|
xPSR: 0x61000000 pc: 0x00000e1a msp: 0x20001b2c
|
|
|
|
> flash write_image erase PATH-TO-YOUR-BINARY/YOUR-BINARY.bin 0
|
|
wrote xxx bytes from file PATH-TO-YOUR-BINARY/YOUR-BINARY.bin in xx.yys
|
|
(x.yyy KiB/s)
|
|
|
|
> reset
|
|
```
|
|
|
|
### Debugging manually
|
|
|
|
First you have to start OpenOCD as described in the section above.
|
|
|
|
Then enter the following in a new terminal:
|
|
|
|
```
|
|
$ arm-none-eabi-gdb -tui "<your binary ELF>"
|
|
|
|
(gdb) target remote localhost:3333
|
|
Remote debugging using localhost:3333
|
|
0x000119ce in ?? ()
|
|
|
|
(gdb) load
|
|
Loading section .text, size 0x2284 lma 0x16000
|
|
Loading section .ARM.exidx, size 0x8 lma 0x18284
|
|
Loading section .data, size 0x458 lma 0x1828c
|
|
Loading section .jcr, size 0x4 lma 0x186e4
|
|
Transfer rate: x KB/sec, xxxx bytes/write.
|
|
|
|
(gdb) monitor reset halt
|
|
target state: halted
|
|
target halted due to debug-request, current mode: Thread
|
|
xPSR: 0xc1000000 pc: 0x000006d0 msp: 0x000007c0
|
|
|
|
(gdb) break main
|
|
Breakpoint 3 at 0x123123: file ../main.c, line xx.
|
|
(gdb) continue
|
|
Continuing.
|
|
```
|
|
|
|
### Using UART
|
|
|
|
The UART pins are configured in `boards/airfy-beacon/include/periph_conf.h`.
|
|
The default values are PIN 17 and 18.
|
|
|
|
The default Baud rate is `115 200`.
|
|
*/
|