/**
@defgroup boards_msb430 MSB-430
@ingroup boards
@brief Support for the ScatterWeb Modular Sensor Board 430
 ## MCU
| MCU | TI MSP430F1612 |
|:----------------- |:------------------------------------------------------------- |
| Family | MSP430 |
| Vendor | Texas Instruments |
| Package | 64 QFN |
| RAM | 5 KiB |
| Flash | 55 KiB |
| Frequency | up to 8 MHz |
| FPU | no |
| Timers | 2 (2x 16bit) |
| ADCs | 1x 8 channel 12-bit |
| UARTs | 2 |
| SPIs | 2 |
| I2Cs | 1 |
| Vcc | 1.8 V - 3.6 V (battery holder board provides 3.0 V) |
| Datasheet MCU | [Datasheet](https://www.ti.com/lit/ds/symlink/msp430f1612.pdf)|
| User Guide MCU | [User Guide](https://www.ti.com/lit/ug/slau049f/slau049f.pdf) |
| Website | [MSB-430](https://www.mi.fu-berlin.de/inf/groups/ag-tech/projects/ScatterWeb/modules/mod_MSB-430.html) |
@warning While programming, the minimum supply voltage is 2.7 V instead of
1.8 V.
@warning When the supply voltage supervisor (SVS) (a.k.a. brownout detection)
is used, the supply voltage must initially be at least 2.0 V due to
the hysteresis of the SVS circuitry. Afterwards the MCU remains
operational with VCC >= 1.8 V.
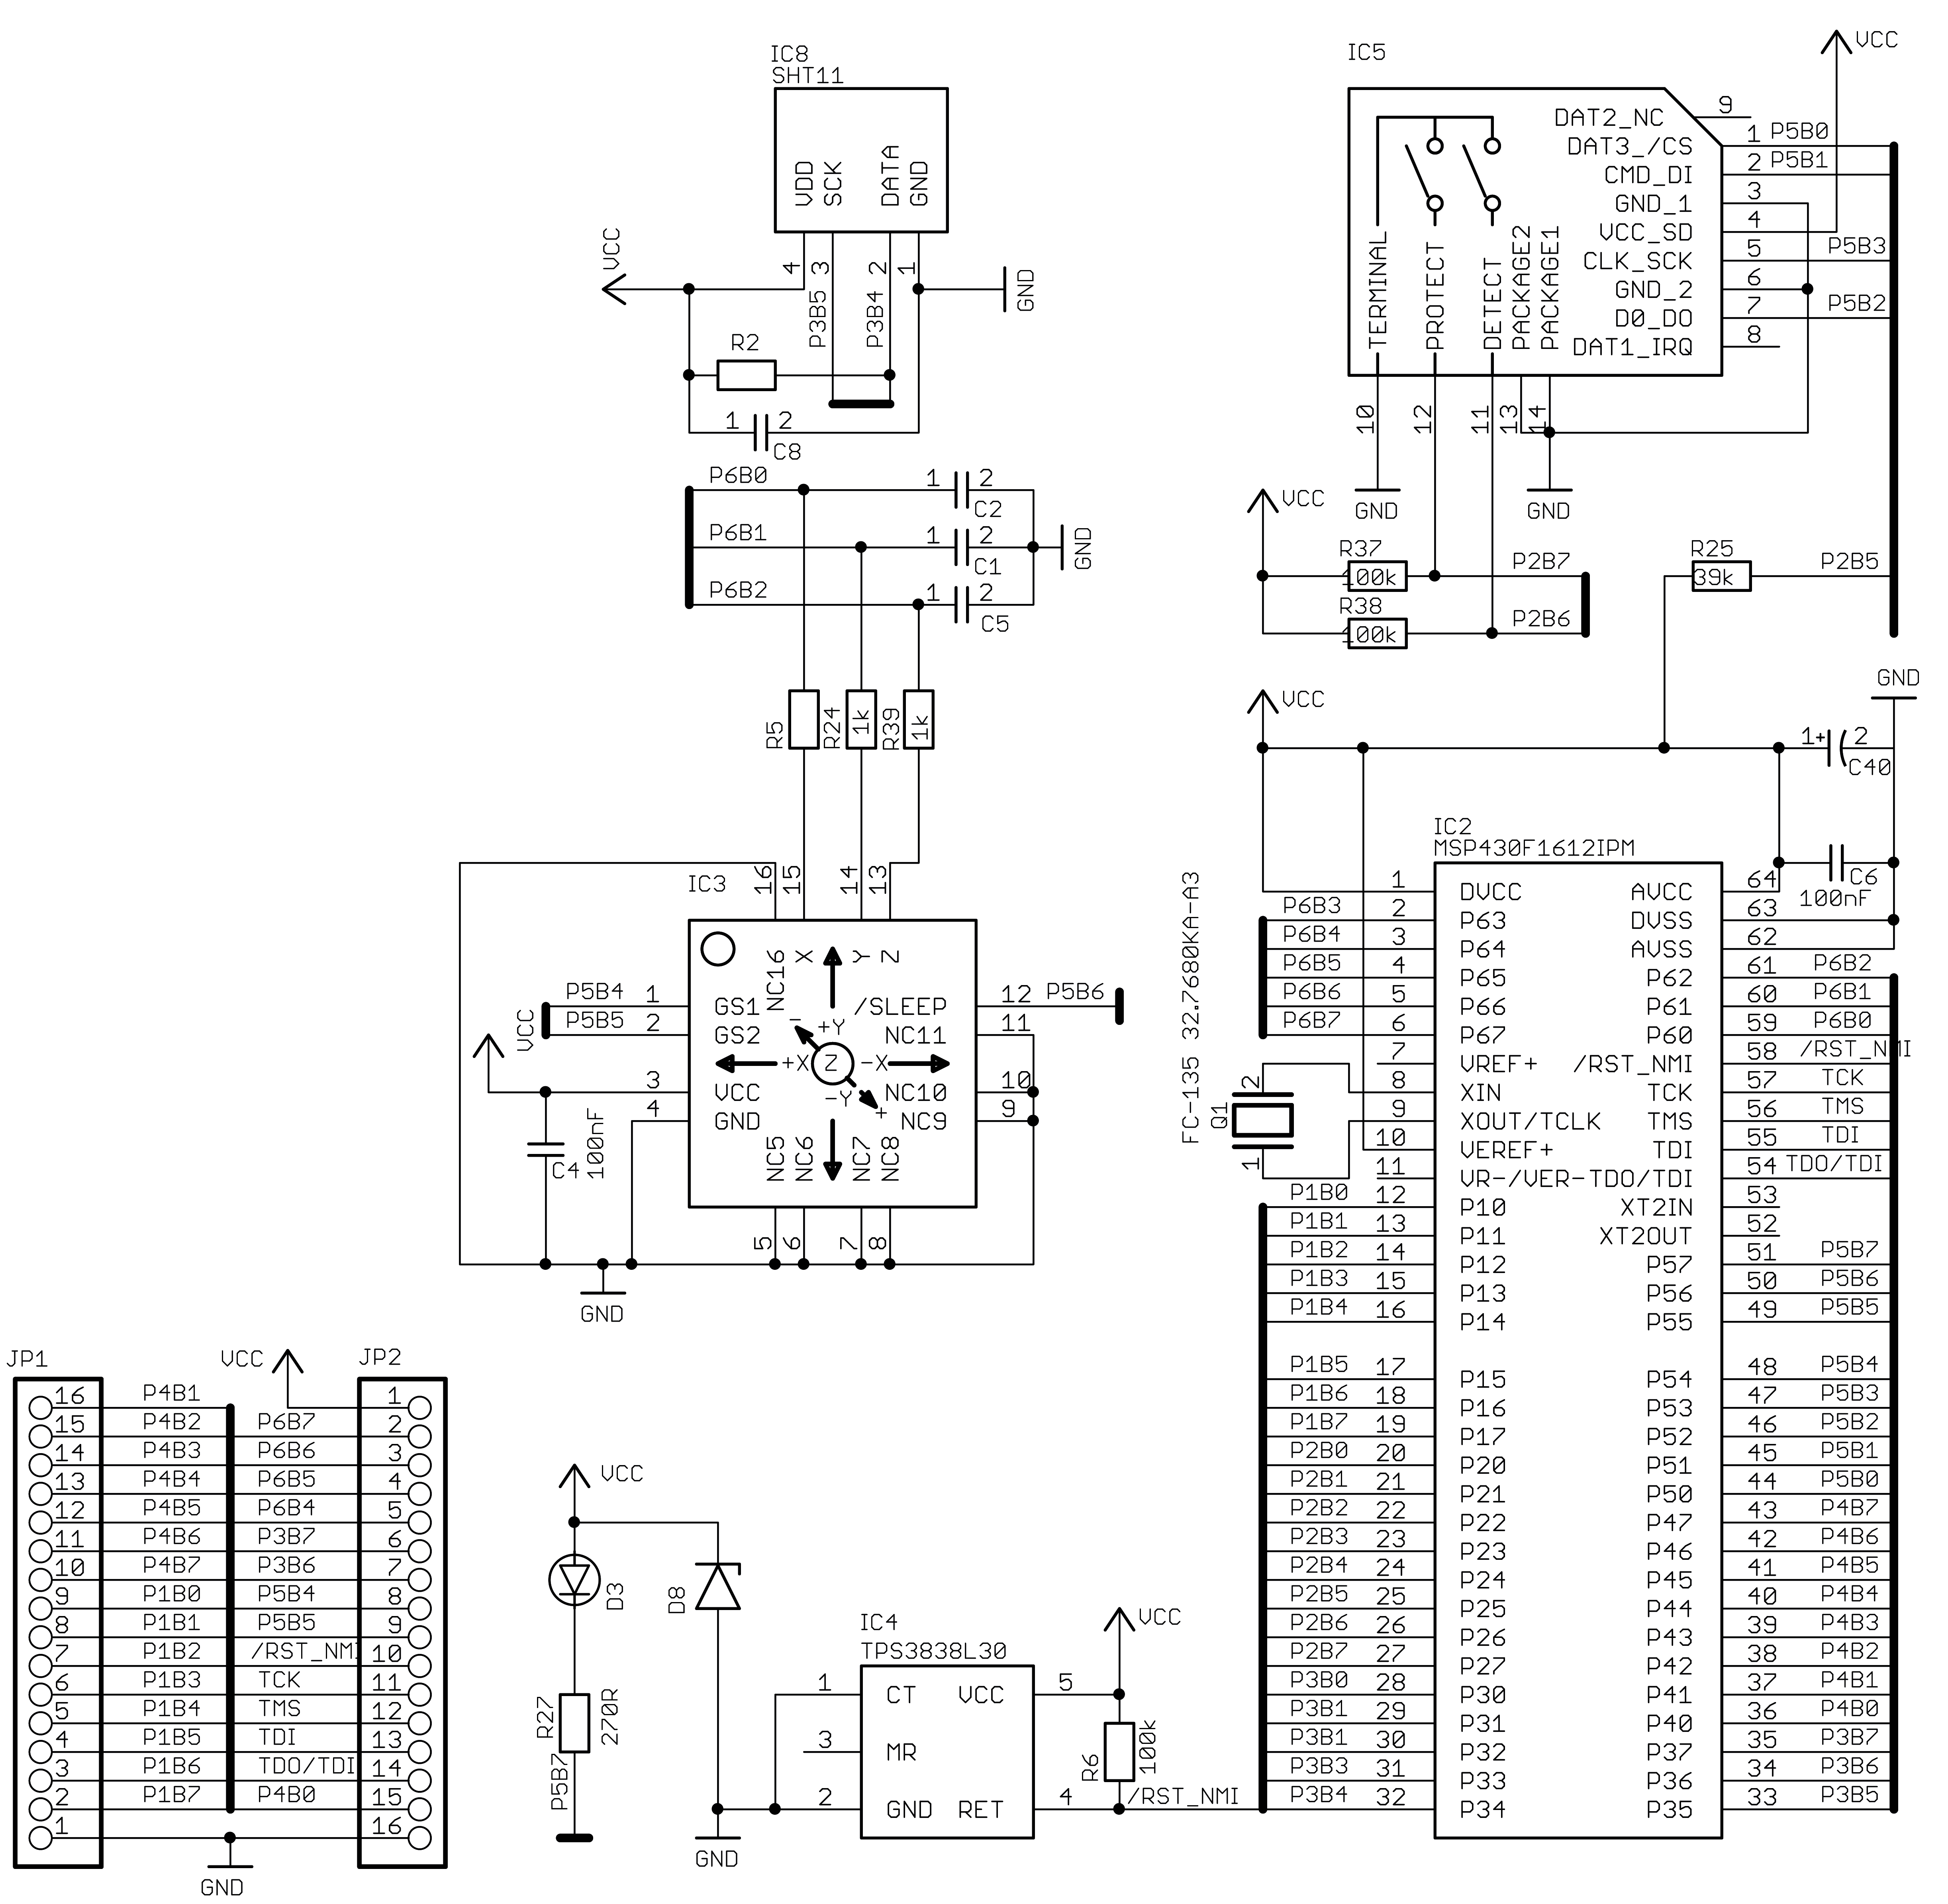
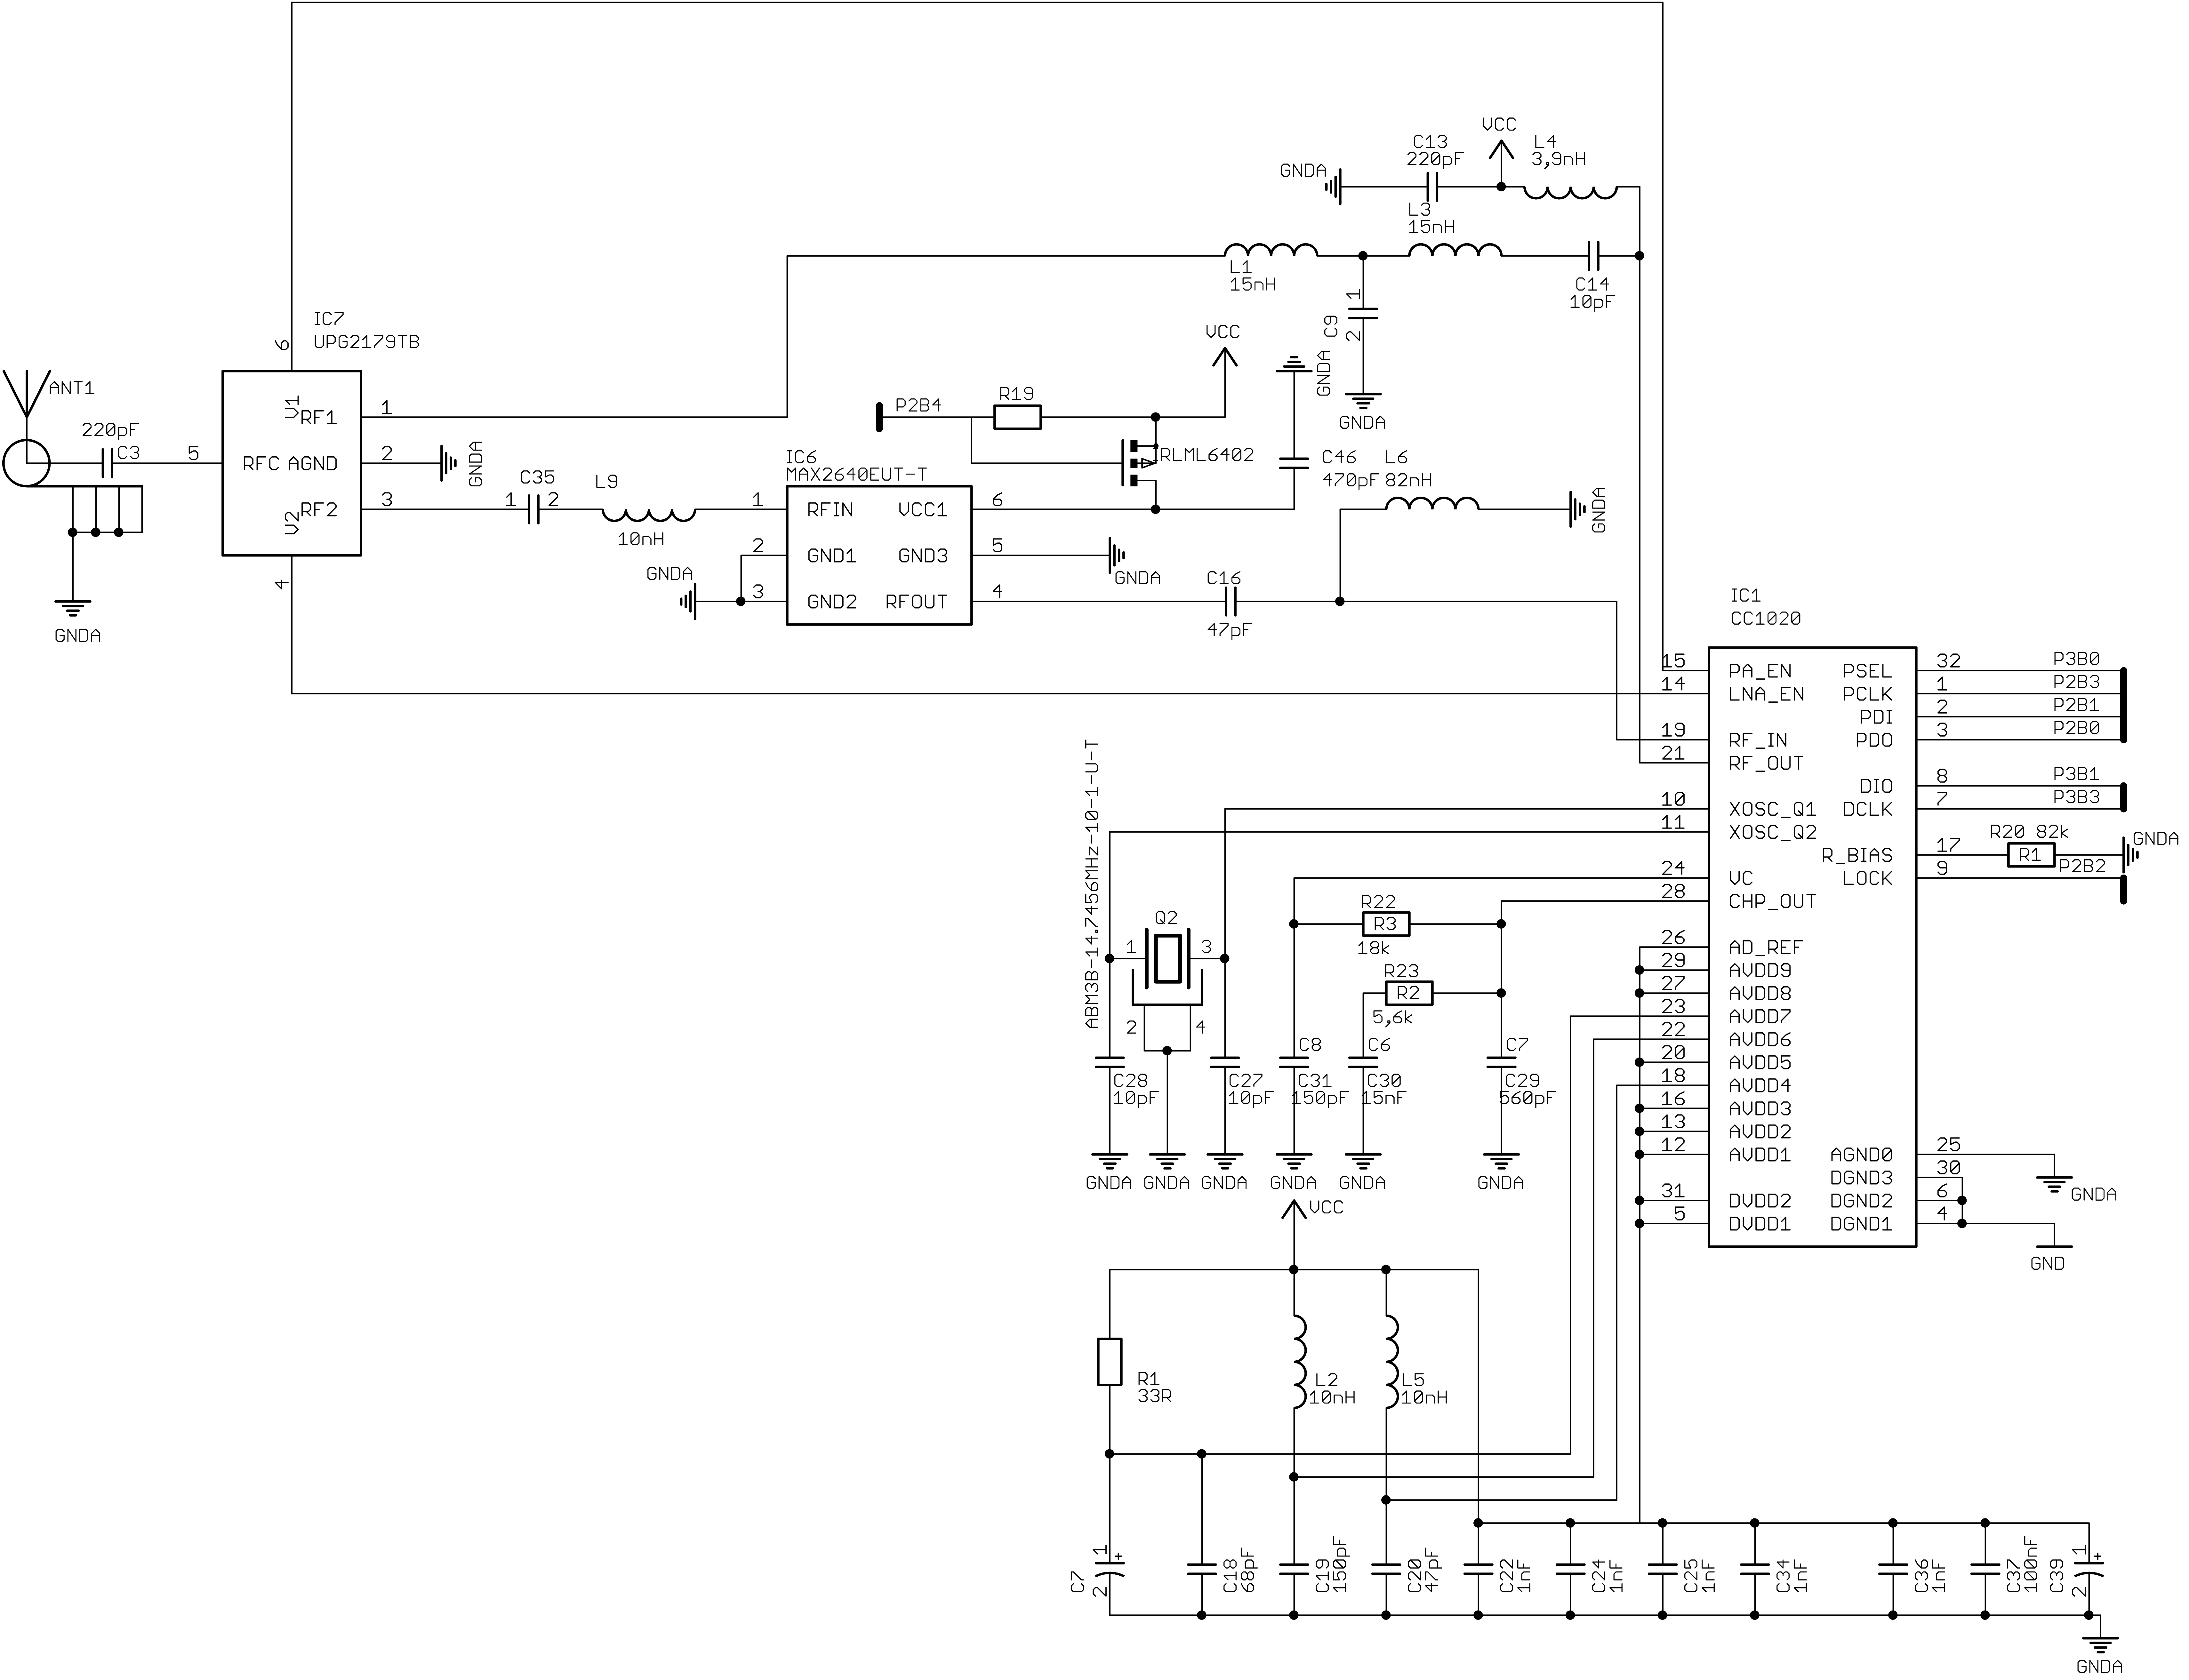
## Schematics

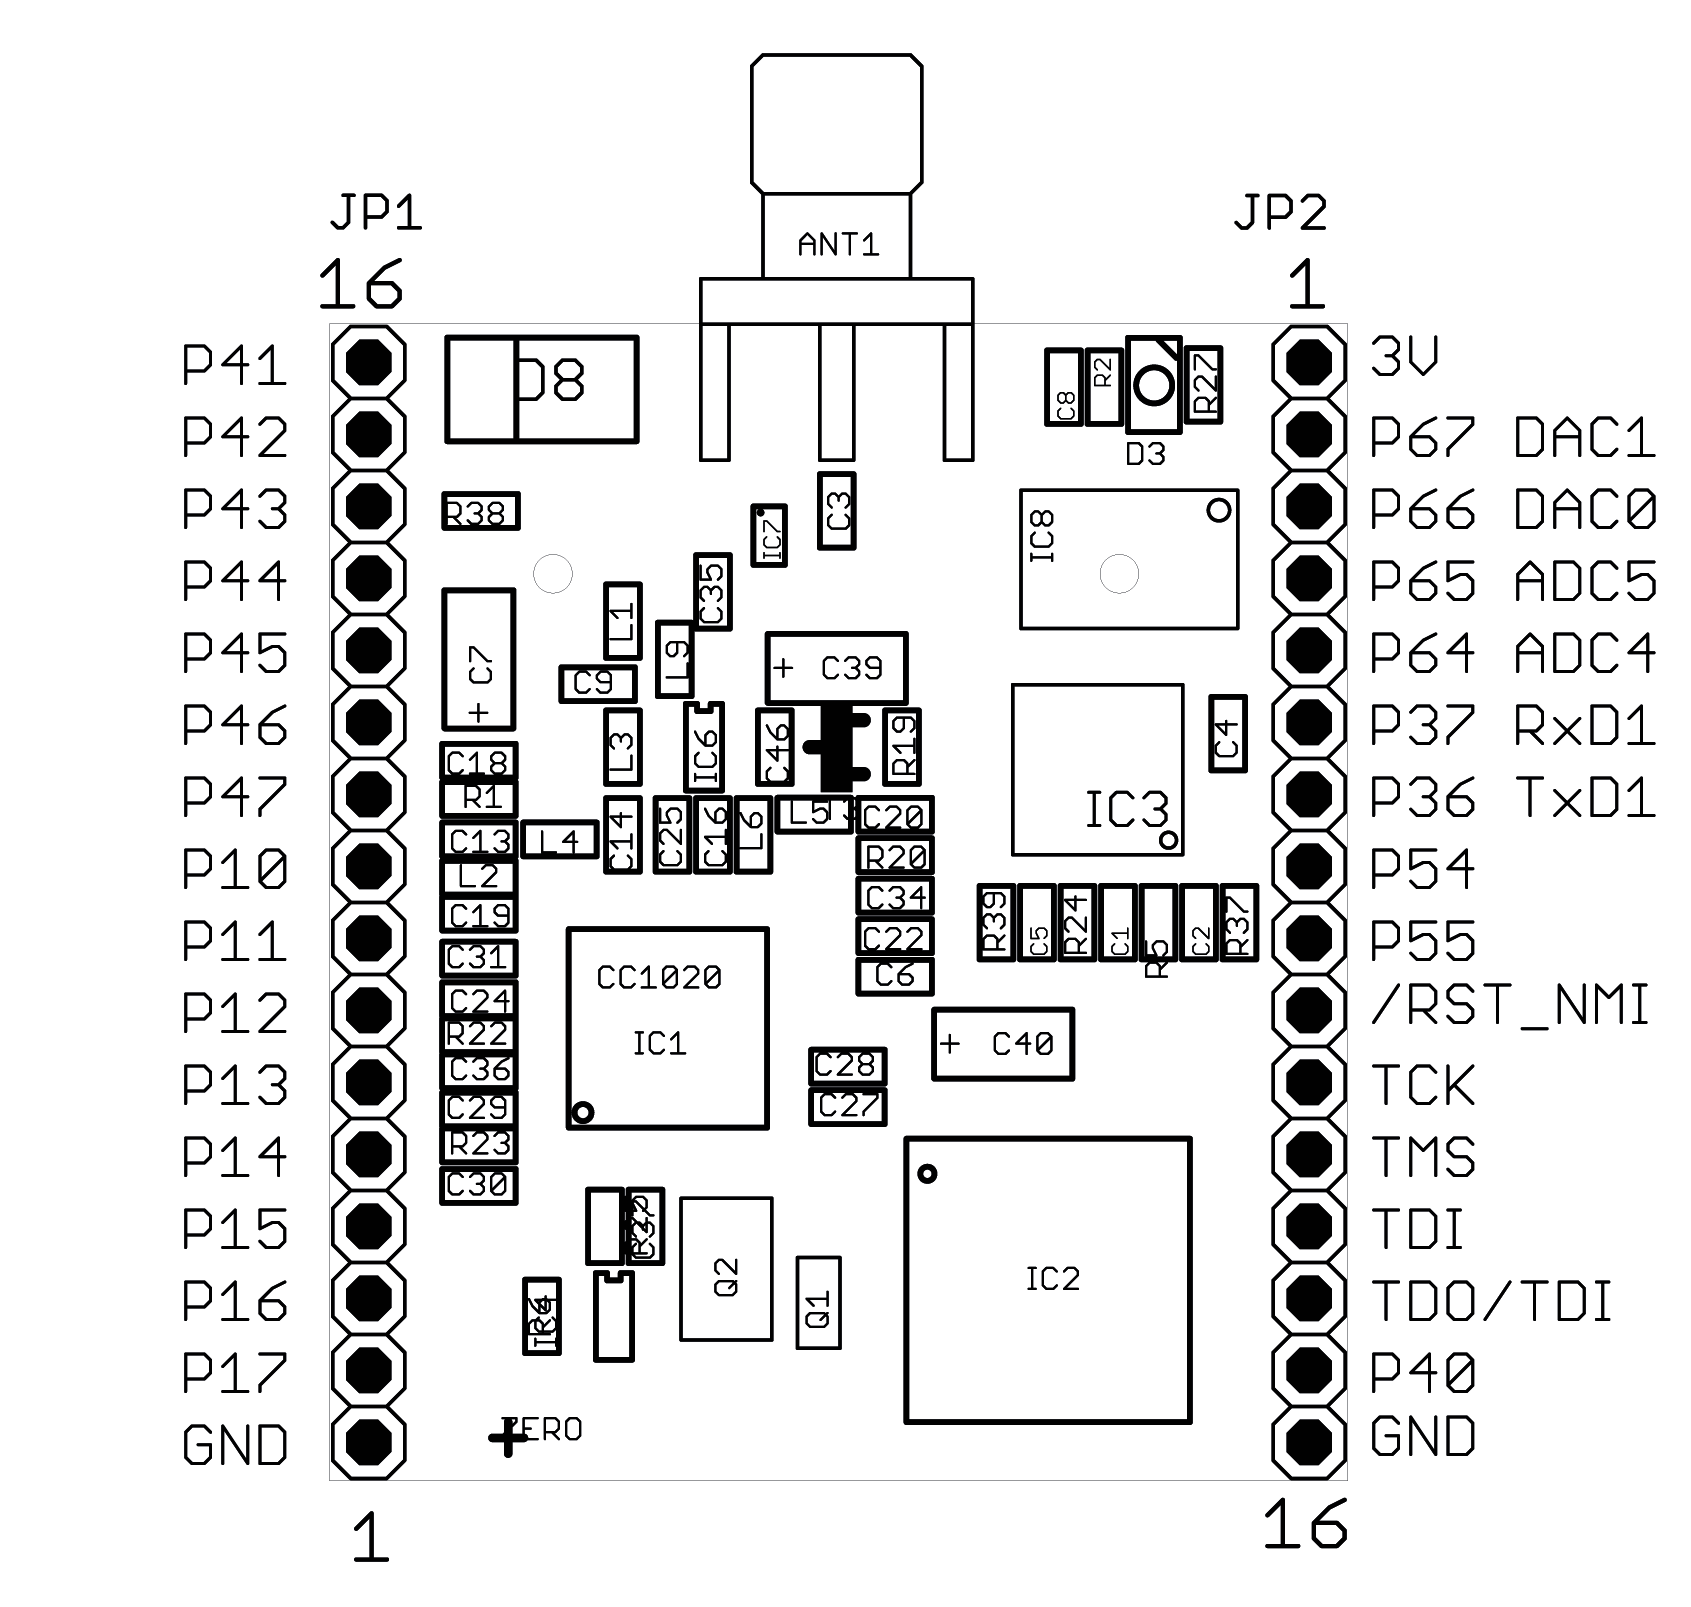
 ## Pinout
### Pinout of the Main MSB 430 Board
 ### Pinout of the Battery Holder Board
The pins above the JTAG header with the pin closest to the power supply switch
being denoted as Pin 1, the signals are as follows:
| Pin | 1 | 2 | 3 | 4 | 5 | 6 |
|:--------- | -----:| -----:| -----:| -----:| -----:| -----:|
| Signal | GND | NC | 5V | RXD | TXD | NC |
The battery holder board contains a 3V power regular that powers the MSB-430
board via 3V pin (pin 1 on JP2). The switch at the bottom can be used to select
the input voltage of that power regulator: If the switch is in the position
towards the daughter board, it will use the 5V pin of the header above the
JTAG header as power supply, otherwise the batteries are used as power supply.
## Flashing RIOT
Place the MSB-430 board into the batter holder board with the SD card socket
facing towards the battery holder board and the (likely unpopulated) antenna
connector facing away from the switch and JTAG-connector of the battery holder
board. (As shown in the picture at the top of the page.)
Afterwards, connect a JTAG debugger supported by
[mspdebug](https://dlbeer.co.nz/mspdebug/); by default the
Olimex MSP430-JTAG-Tiny is assumed, which is among the less expensive options.
@note If you are not using the Olimex MSP430-JTAG-Tiny (or a compatible
programmer), set `MSPDEBUG_PROGRAMMER` to the correct value via
an environment variable or as parameter to make. E.g. use
`make BOARD=msb-430 MSPDEBUG_PROGRAMMER=bus-pirate` to
flash using the bus pirate.
@warning It is recommended to use the external power supply via the 5V pin
instead of the battery while flashing.
Once the board is firmly connected in the battery holder and the JTAG cable is
connected, just run
```
make BOARD=msb-430 flash
```
in the application's directory.
## Using the shell
stdio is available via the UART interface with `RXD = P3.7`
(pin 35 on the header) and `TXD = P3.6` (pin 34 on the header) at 115,200 Baud.
The easiest way is to connect an USB TTL adapter (such as the cheap `cp210x`
or `ch341` based adapters) to the battery holder board as follows:
```
TTL adapter MSB-430 Battery Holder Board
----------- ----------------------------
GND --- 1 (GND)
TXD --- 4 (RXD / P3.7)
RXD --- 5 (TXD / P3.6)
5V --- 3 (5V)
```
*/

 ## Pinout
### Pinout of the Main MSB 430 Board
 ### Pinout of the Battery Holder Board
The pins above the JTAG header with the pin closest to the power supply switch
being denoted as Pin 1, the signals are as follows:
| Pin | 1 | 2 | 3 | 4 | 5 | 6 |
|:--------- | -----:| -----:| -----:| -----:| -----:| -----:|
| Signal | GND | NC | 5V | RXD | TXD | NC |
The battery holder board contains a 3V power regular that powers the MSB-430
board via 3V pin (pin 1 on JP2). The switch at the bottom can be used to select
the input voltage of that power regulator: If the switch is in the position
towards the daughter board, it will use the 5V pin of the header above the
JTAG header as power supply, otherwise the batteries are used as power supply.
## Flashing RIOT
Place the MSB-430 board into the batter holder board with the SD card socket
facing towards the battery holder board and the (likely unpopulated) antenna
connector facing away from the switch and JTAG-connector of the battery holder
board. (As shown in the picture at the top of the page.)
Afterwards, connect a JTAG debugger supported by
[mspdebug](https://dlbeer.co.nz/mspdebug/); by default the
Olimex MSP430-JTAG-Tiny is assumed, which is among the less expensive options.
@note If you are not using the Olimex MSP430-JTAG-Tiny (or a compatible
programmer), set `MSPDEBUG_PROGRAMMER` to the correct value via
an environment variable or as parameter to make. E.g. use
`make BOARD=msb-430 MSPDEBUG_PROGRAMMER=bus-pirate` to
flash using the bus pirate.
@warning It is recommended to use the external power supply via the 5V pin
instead of the battery while flashing.
Once the board is firmly connected in the battery holder and the JTAG cable is
connected, just run
```
make BOARD=msb-430 flash
```
in the application's directory.
## Using the shell
stdio is available via the UART interface with `RXD = P3.7`
(pin 35 on the header) and `TXD = P3.6` (pin 34 on the header) at 115,200 Baud.
The easiest way is to connect an USB TTL adapter (such as the cheap `cp210x`
or `ch341` based adapters) to the battery holder board as follows:
```
TTL adapter MSB-430 Battery Holder Board
----------- ----------------------------
GND --- 1 (GND)
TXD --- 4 (RXD / P3.7)
RXD --- 5 (TXD / P3.6)
5V --- 3 (5V)
```
*/